5 Lower Ab Exercises (YOU’RE DOING WRONG!)
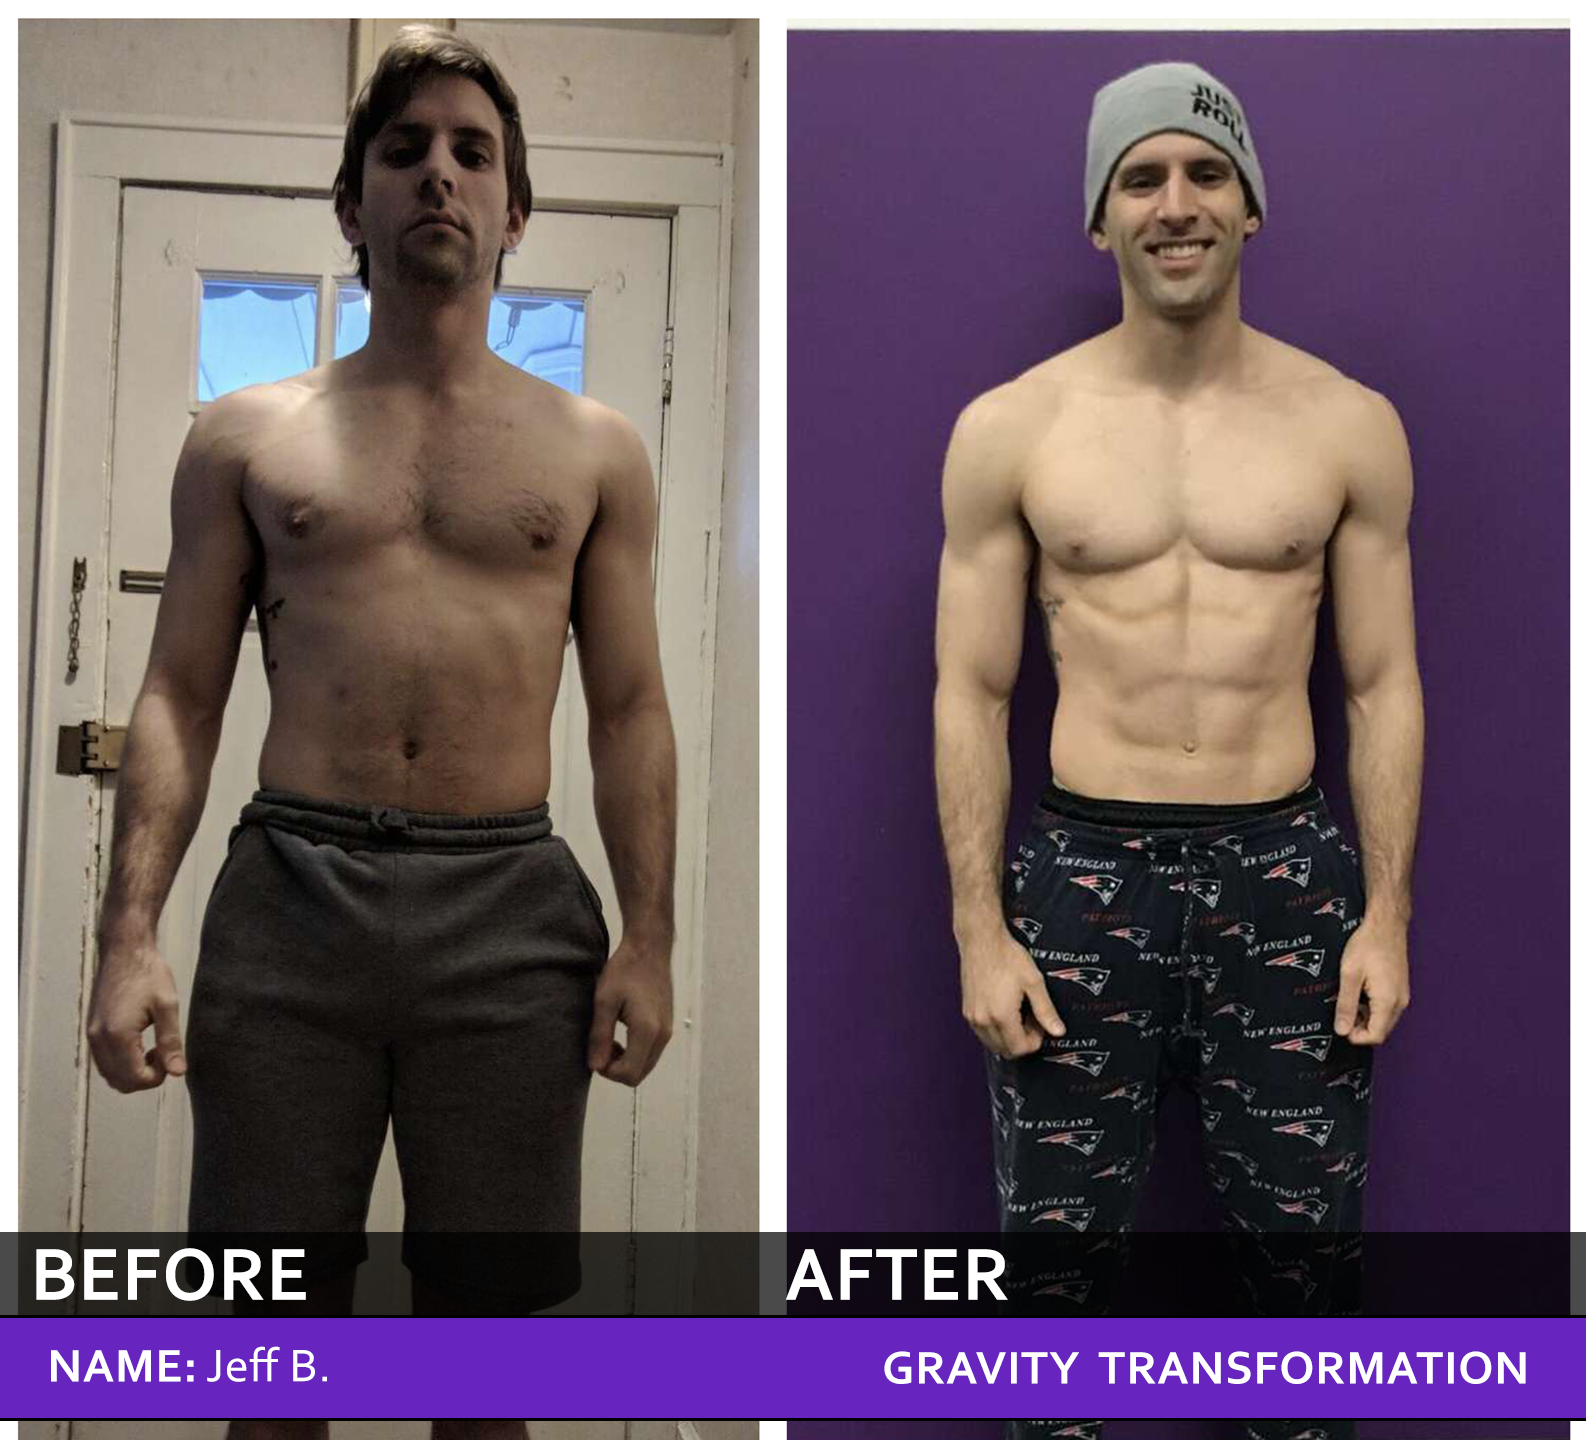
Check out my client Jeff’s transformation where he gained a whole bunch of Ab muscle
The development of nicely defined lower abs seems to be a common sticking point for many people.
You may have found some success at developing the top portion of your abs…maybe you see those top two or 4 abdominal muscles starting to pop out
but as you get lower you’re experiencing more and more difficulty getting that bottom section of your abs to show.
And one thing’s for certain if you want to see a full complete looking six-pack with a slim v cut waistline you’re going to have to be doing the right things.
And even though diet is of Paramount importance the exercises and the workouts that you’re doing to build your lower ab muscles are almost equally as important.
At the end of the video I’ll also give you some insight on how you can take all of this information
So that’s why I want to go over the 5 best lower ab exercises that you’re actually probably not even doing.
These are gonna be by far the most efficient lower ab exercises out there that’ll put the most stress on that bottom portion of your abs so you could experience the fastest results possible.
Before we dive into the first exercise I’d like to mention that your rectus abdominus which is that outer layer six-pack looking muscle is 1 muscle group.
So we can’t strictly isolate the lower abs without also incorporating some upper ab work as well.
But what we can do is we can put more tension on the lower ab area by doing exercises from different angles, by adjusting our form and by incorporating more efficient training techniques.
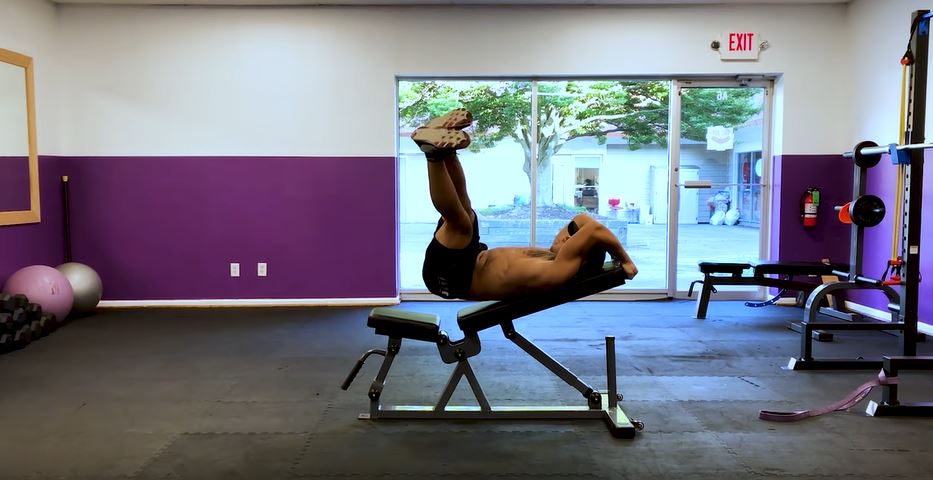
Let’s start with one of the most efficient lower ab exercises that you’re probably not doing, it’s called an incline leg raise with a pulse up.
The inclined angle of this movement presents an advantage that most hanging and lying flat down movements don’t have.
Meaning incline leg raises are going to be far more efficient then regular leg raises done flat on your back because with regular flat leg raises you can only bring your legs up to about 60 degrees before the tension comes off of your abs.
Once you go past that and get closer to 90 degrees your bones and joints begin to carry the load instead of the abdominal muscles you’re trying to target.
Also as you lower your legs back down the tension quickly switches over to your hip flexors before you even get back to your neutral starting position.

The regular “hanging” leg raises are also not quite as efficient because when you’re perfectly vertical it’s once again easy to incorporate a lot more of your hip flexors into the movement.
There is a modified way to perform hanging leg raises in which you can target your abs much more effectively which I’ll go over in a bit, but with the incline bench, I want you to understand what you’re getting a perfect angle to Target the abs.
To do this exercise you would use the same bench that you would use for decline sit-ups except instead of having your legs above your head is going to be above your legs.
For this reason, you’re going to need something to grab behind your head to keep yourself from sliding down the bench.
Once you’re in a position with your hands gripping something behind your head you’re raising your legs straight up all the way until you’re feet are pointed up towards the ceiling.
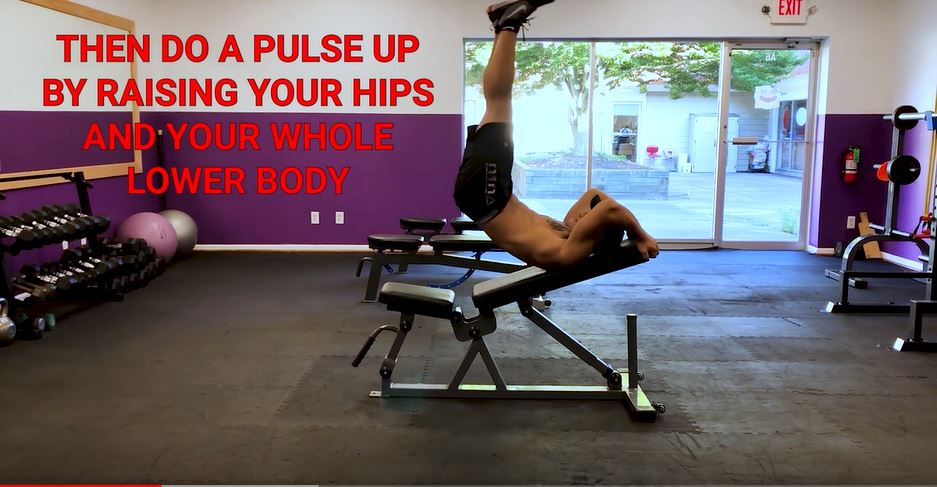
Once your feet are directly pointed towards the ceiling you’re going to do a pulse up by raising your hips and your whole lower body off the bench up towards the ceiling in a straight line.
don’t bring your feet and legs behind your head while doing this keep them straight up towards the ceiling.
After the pulse up slowly lower your hips back down to the bench and then lower your legs back down almost all the way until you touch the bottom of the bench and then go right back up.
With your very first rep, you’ll notice how much more of a range of motion you’ll get out of this exercise versus regular flat and hanging leg raise movements.
As you progress with this exercise you can try to add a weight between your feet as well to make it more challenging.
But due to the fact that this movement is much more challenging then regular leg raises it’ll take you some time to progress to the point where you can add weight.
Let’s move on to my second favorite lower ab movement that can be done almost anywhere with minimal equipment.
The val slide pike, but we’re not just doing a regular Val slide pike we’re doing it with a resistance band around our feet.
And by adding this slight variation it really makes a huge difference. With regular val slide pikes, the only resistance that our abs are getting is the friction from our bodyweight sliding against the floor.
Even though this may sound really challenging, it’s not because the val slides are furniture movers.
Which means they’re designed to help you move really heavy furniture across the floor.
By adding on the resistance band we create a force that pulls your legs straight back and when we have resistance pulling your legs straight back in combination with the resistance of your feet sliding along the floor we’re creating tension at the ideal angle to hit our lower abs.
To perform this exercise safely and correctly you want to start by wrapping one end of the resistance band around something heavy and stable that won’t move when you pull on it.
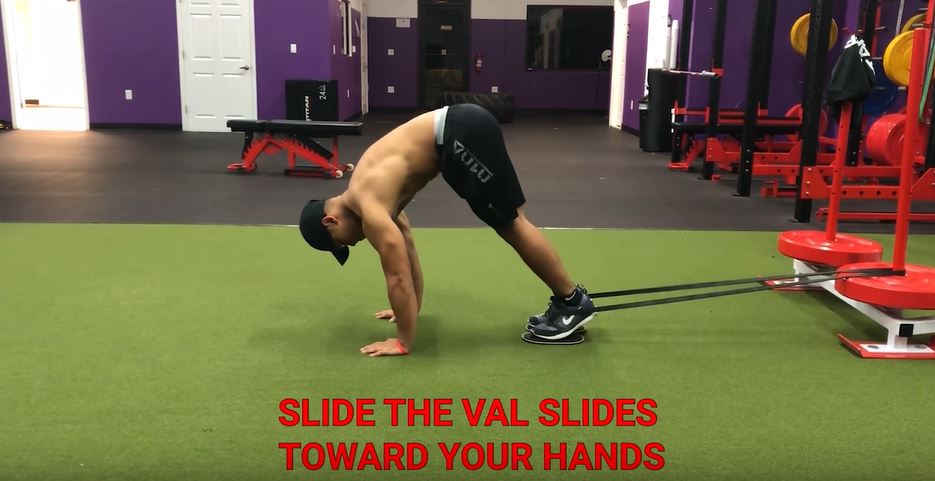
Put your val slides or furniture movers inside the resistance band and position your feet so that your toes are in the center of the sliders.
Next place the resistance band around your ankles, get into a pushup position and walk your body forward until you no longer feel slack and instead feel some resistance pulling you back.
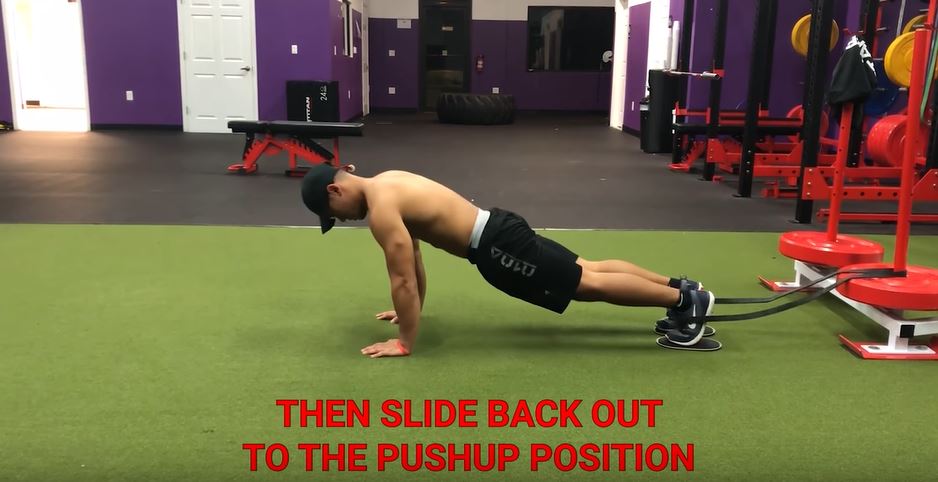
Slide the val slides toward your hands until your hips are up high towards the ceiling then slide back out to the pushup position and repeat.
While performing the movement concentrate primarily on raising your hips up and rotating them into your chest.
You can progressively overload this exercise over time simply by walking out further and stretching the resistance band more.
Next, I want to go over another extremely effective lower ab exercise that incorporates the resistance band.
Banded reverse crunches. Normal reverse crunches are not going to keep much tension on the abs throughout the movement,
but with the resistance band, we can really increase tension on the lower ab muscles. By using a resistance band
we have more of a horizontal angle of resistance that we wouldn’t be able to get otherwise.
With a dumbbell between the feet, for example, the resistance would be straight up and down and you would lose tension multiple times throughout the movement.
On the other hand, the resistance band will give us that perfect angle that we’re looking for to target the abs.
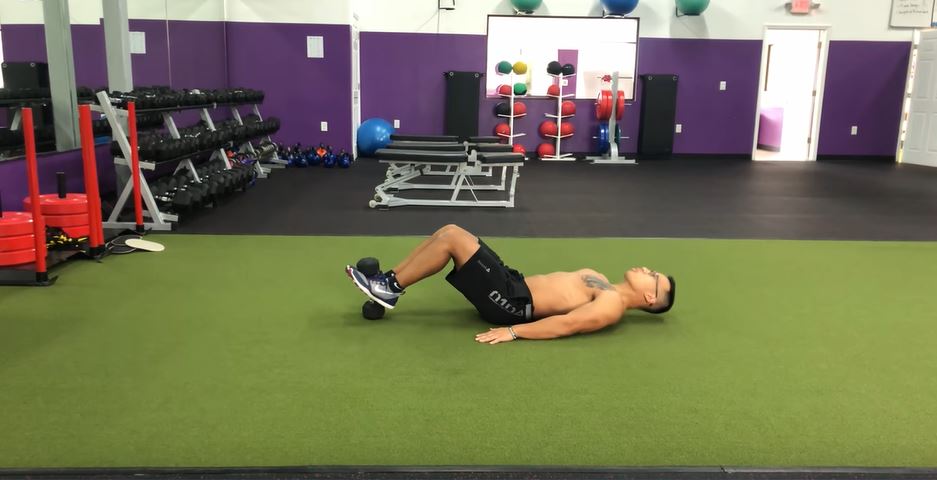
Start by setting up the resistance band at a low enough level so that when you’re standing straight up its about midway up your shins.
Lay down flat on your back, place your hands under your butt, bend your knees so they are perpendicular to the floor and position your ankles under the resistance band.
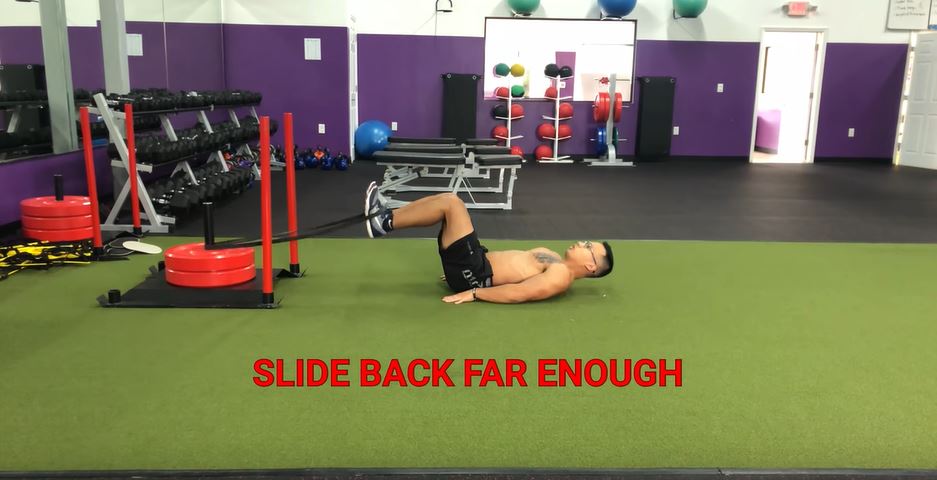
Slide back far enough once again to remove all slack and create some tension. Curl your hips and knees into your chest as your feet and shins elevate off the ground.
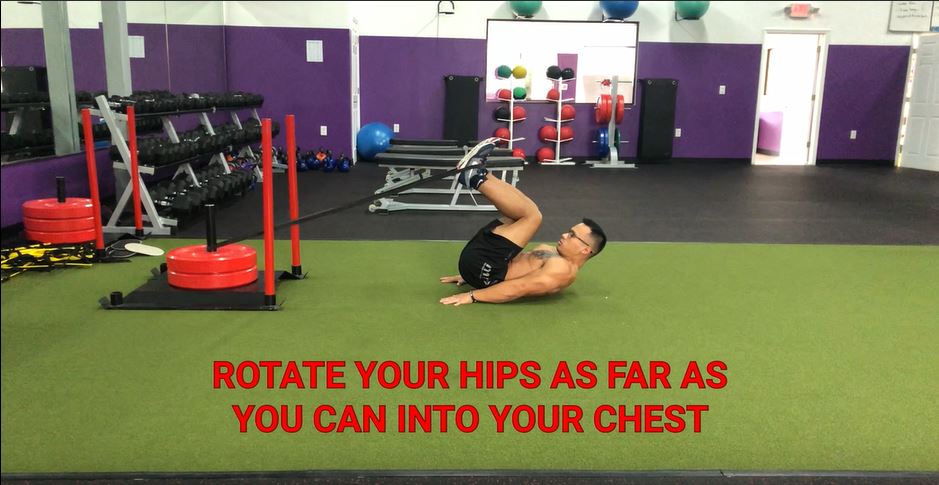
Try to rotate your hips as far as you can into your chest and squeeze before lowering back down to the starting position with your knees bent at a 90-degree angle then repeat.
The key part of this movement is to raise the hips up off the ground because by doing so we are creating torso flexion which is necessary to work the rectus abdominus muscle.
If we’re just raising our legs up and down without rotating out hips into our chest we are going to be using our hip flexors not our abs.
One thing to keep in mind with this exercise is that you’ll want to start with a light band. With a heavy band,
it’s likely you’ll sacrifice form and use your hip flexors instead of your abs.
Let’s move on to our fourth exercise which is going to target the obliques as well as the rectus abdominus.
The obliques are very important to build up because they are an important part of what gives the lower ab muscles that v cut appearance.
With this exercise, we’re once again going back to the incline bench for inclined windshield wipers.
The angle that we get out of this movement makes it a far more effective exercise than regular windshield wipers on the floor because we keep the tension right on our lower abs the entire time.
Windshield wipers on the floor will also pretty much only work your obliques,
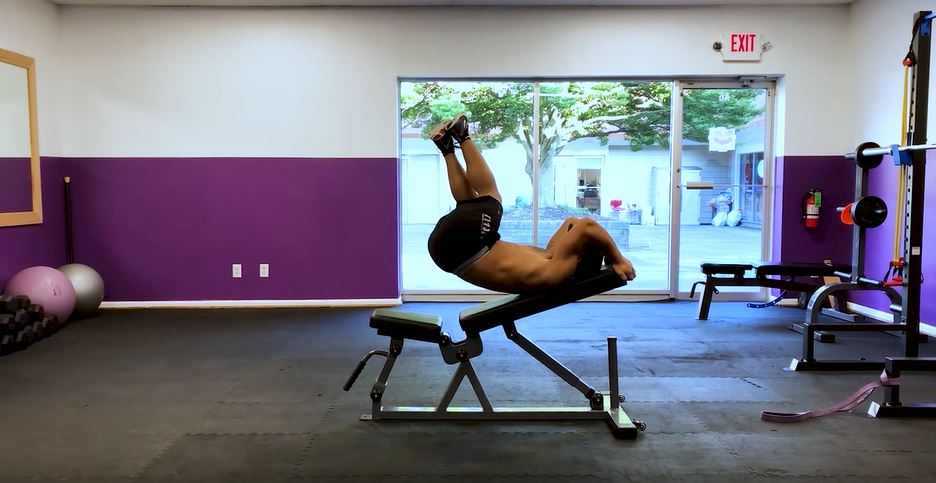
but inclined windshield wipers will put way more tension on that six-pack rectus abdominus muscle because your abs will have to maintain an isometric contraction throughout the entire exercise.
To perform this exercise get into the same position as before with your hands holding on to something behind your head.
From there you can do it one of two ways the easier way or the more advanced way. The easier way would be by bending your knees and pointing them straight up towards the ceiling, raising your hips slightly off the bench, and then rotating your lower body from left to right.
The more advanced way would be by straightening your legs so that your feet are pointed straight up and then rotating left to right from there.
Both ways are challenging and you want to aim for ten reps on each side so make sure you don’t jump to the advanced way until you’re ready.
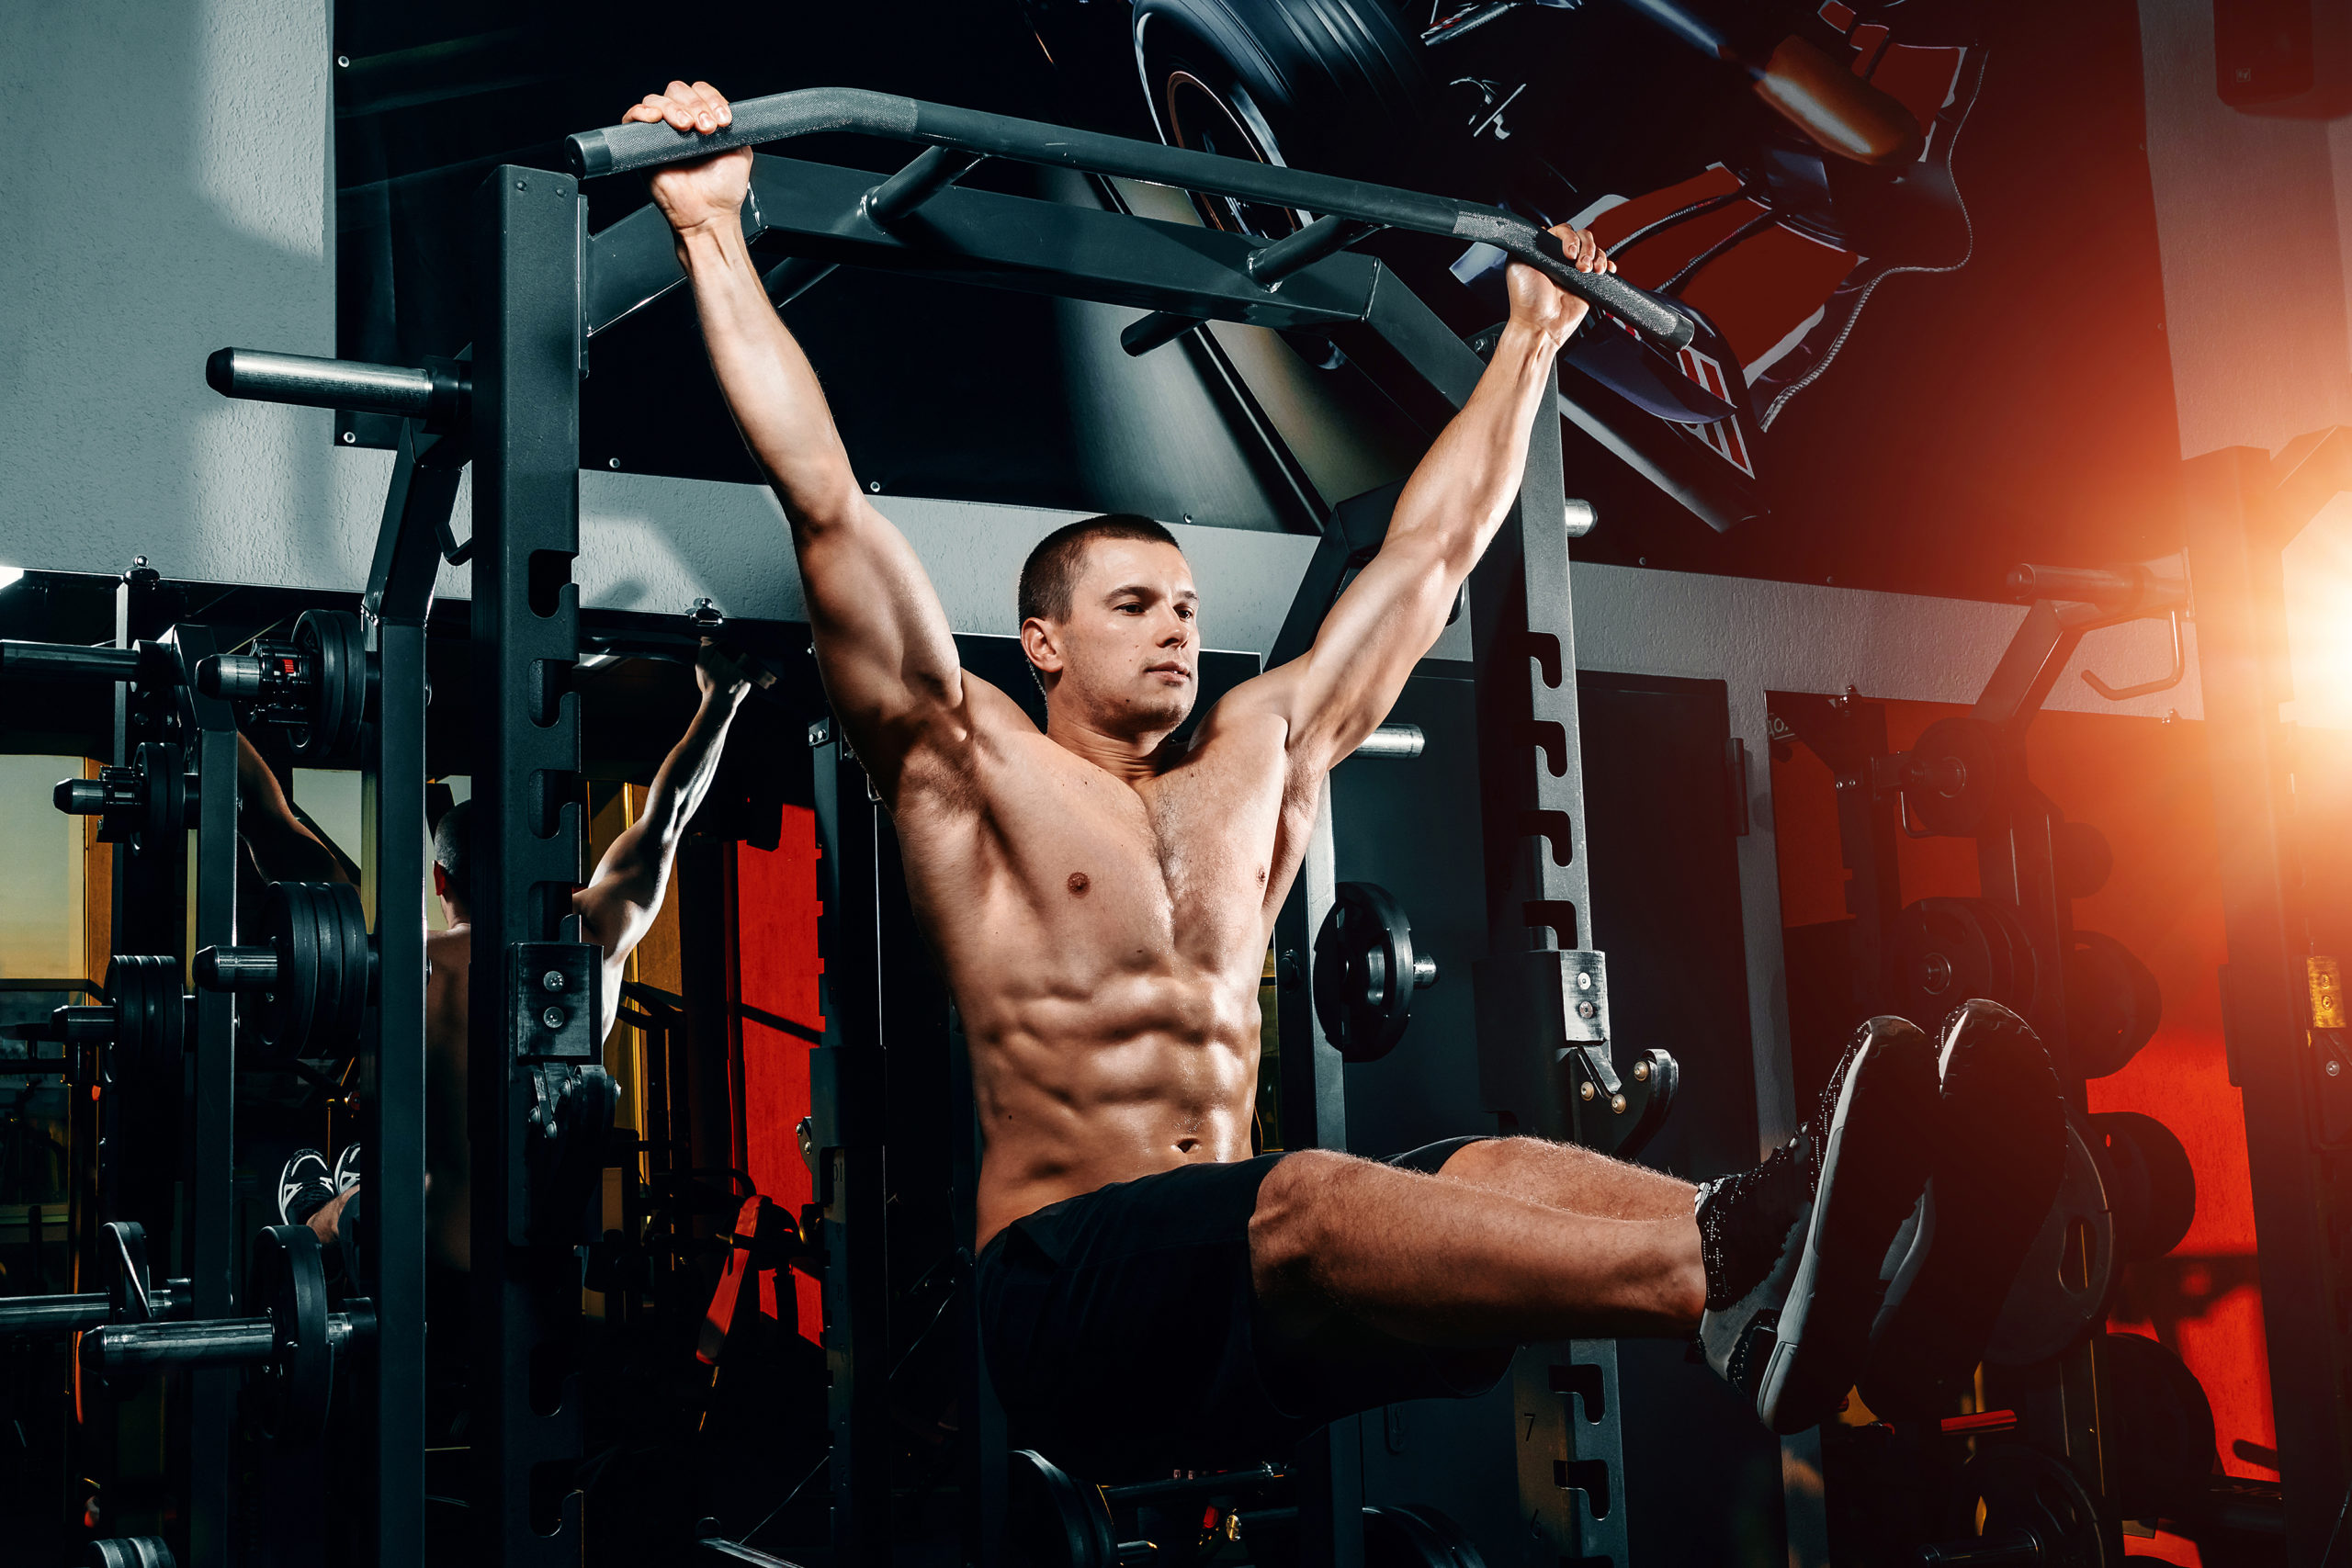
The last lower ab exercise that I want to go over is the modified hanging leg raise that I briefly mentioned earlier.
This exercise is known as the hanging L-sit Leg Lift. With a regular hanging leg raise a huge portion of the work of raising your legs to 90 degrees is done by the hip flexors, not your abs.
So with this version, we are skipping that whole bottom part of the movement by starting in an L seat position, and don’t worry for those of you that struggle with the L- sit I’ll give you a regression in a second.
Start by hanging from a pullup bar with your legs straight out at 90 degrees. Rotate and curl your hips and legs in towards your chest and stop right about when you touch the bar.
Return back to the starting position with your legs at 90 degrees and then repeat.
The regression for this movement would be done by simply bending your knees but still keeping your legs and 90 degrees and performing the movement the same way.
Regardless of which way you do it really concentrate on curling your hips into your chest.
When done correctly it’ll look like you’re trying to point the bottom of your butt in front of you towards the mirror.
By doing the exercise this way you’re making your hip flexors and momentum completely out of the movement.
You’re also incorporating that important factor of torso flexion when curling your hips up into the chest to reach the bar above your head.
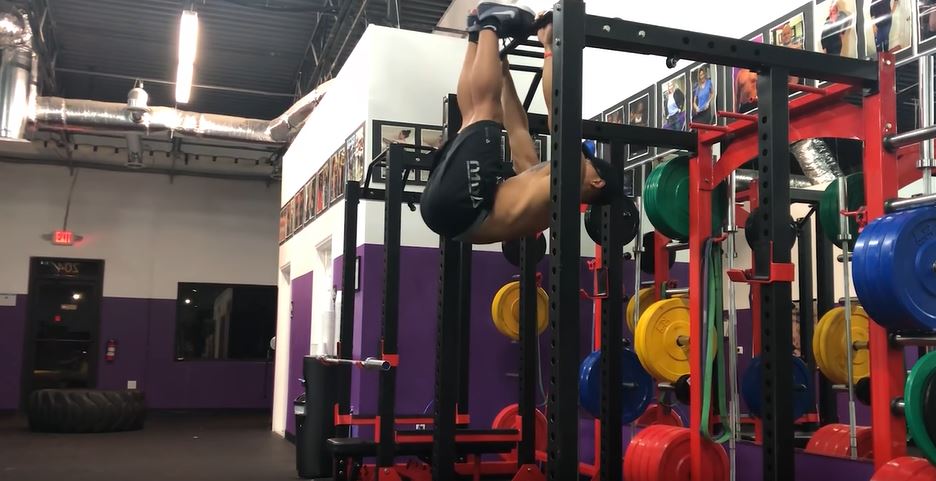
That torso flexion is going to ensure that the tension stays on your abs the whole time rather than your hip flexors.
That’s it, I really hope this video has helped you guy out if you enjoyed it make sure you subscribe to the channel.
And remember as I said at the beginning of the video seeing a really defined six-pack is not just about finding the most efficient ab exercises and fixing your ab workout mistakes, but it’s also about fixing your diet.
Without stripping the fat from your abs with a proper diet plan you’ll never see those ab muscles you work so hard for in the gym.
So make sure you visit my website where we’re running a 6-week challenge specifically designed to help you get shredded so you can see super visible abs.
Most of my clients that have taken part in this challenge have either lost 20 pounds or 5 percent body fat in only 42 days.
You get a 42-day workout plan that includes my ab shredding program, as well as a customized diet plan, and a coach to mentor and guide you through the entire process.
And as long as you simply follow and stick to the plan you can get all the challenge material for free.
To learn more click the link below…….Or you can just visit my website directly at gravitytransformation.com
My passion for fitness began when I was 14 years old. I naturally fell in love with training and haven’t stopped since. At 18 years I acquired my first personal training certification from ACE after which I opened my first of 3 transformation studios in 2011. I love to share my knowledge through personal training, my online courses, and youtube channel now with over 3,000,000 subscribers! I can happily say that we've helped over 15,000 people get in great shape over the years. I'm always here for my customers so if you need help don't hesitate to send your questions to support@gravitychallenges.com
 Founder // Gravity Transformation, Max Posternak